Manual + possible faults / solutions
![]()
![]()
Pay attention!!
The hydrographic film is very sensitive to moisture and temperature. In order to ensure the durability and the quality you best save the film in a space with less than 60% moisture and a temperature between 20 ° C and 25 ° C.
Dipping tips for you!!
- Read this manual thoroughly 2 times, including the possible errors and solutions!
- Check out some videos on our site.
- Check in advance your item well and think about how you are going to dip it.
- Make sure that the water has the correct temperature.
- First, take a few small tests before dipping your final object.
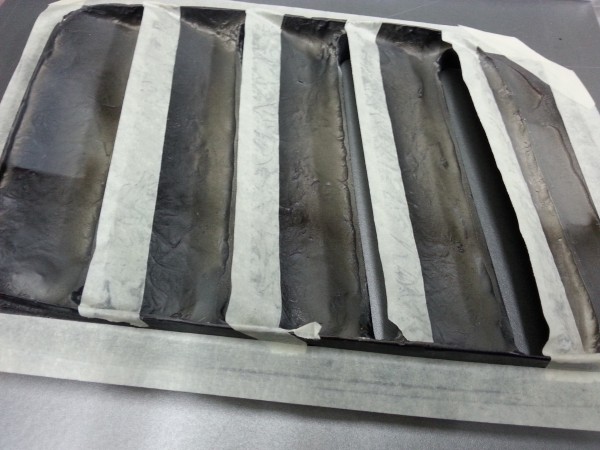
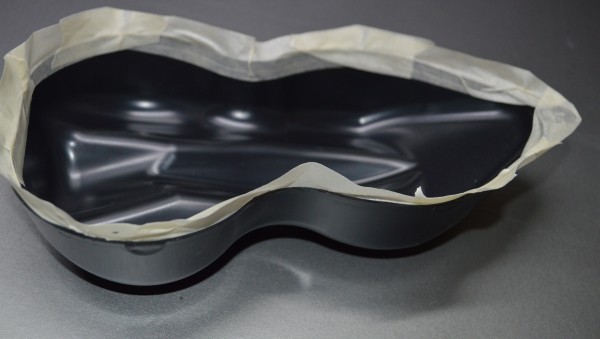
- Use masking tape on the edges of your object. The tape ensures that the print is not released at the edges, when you pull the object above water. See sample photos!
Use latex gloves for protection!
STEP 1: CLEANING
Clean the object that you want to dip in water with dish soap. Then rub the object with fine sandpaper.
Clean the object with degreasing agent and a lint-free cloth (dust free surface).
STEP 2: PRIMER
Now you provide the object first with a primer (eg. A plastic primer for plastic).
(Never breathe spray mist! Work in a well ventilated area!)
Before starting the following process, you need the item to dry for about 10 minutes. Do not touch the object which is provided with the adhesive primer at that time.
STAP 3: BASECOAT
This is the special base color for the dipping.
Before you provide the object with the basic color, you must always ensure that there are no scratches or damages. This will always be visible.
Now you bring the base color onto the object. (Never breathe spray mist! Work in a well ventilated area!)
Before starting the following process, you need the item to dry at least 30 minutes (depending on ambient temperature).
When the object is dry; rough the object lightly with very fine sandpaper or scotch brite gray before you start dipping. It is wise to provide painters tape on the edges. Because the tape ensures that the print is not released at the edges, when you pull the object above water.
During the drying time, you can continue with the following steps.
STEP 4: PREPARATION FILM
Good preparation is essential !!!
Pay attention! Make sure there is no dust on the film. This can be removed with a tack cloth or a lint-free cloth. Do not touch the film too much with your bare hands.
Tip: Do not be stingy with the film and cut it broadly. This facilitates the dipproces. If there is water on the sides, you can still run the dipproces.
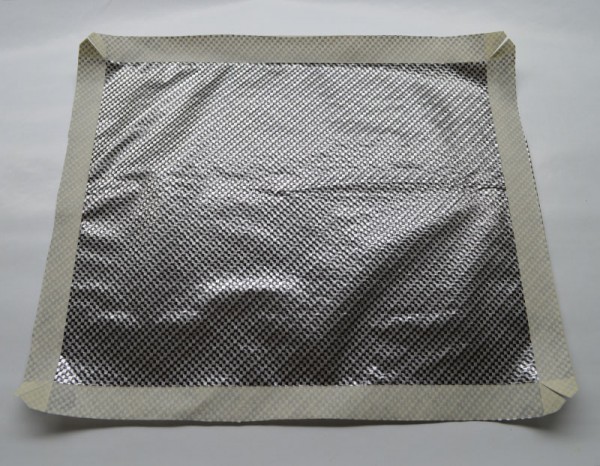
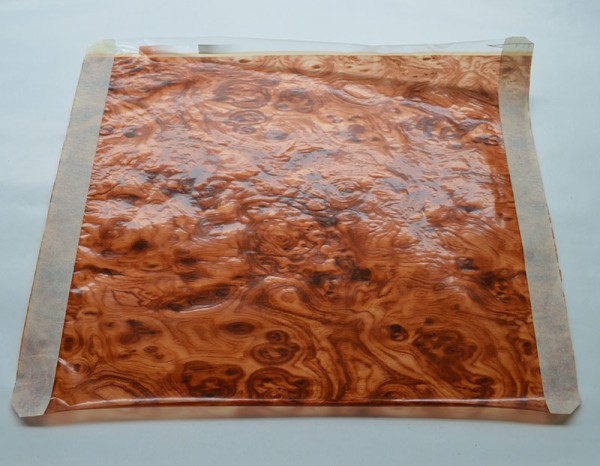
Take the water transfer printing film. First tape off the required piece of film and then cut it out.
At prints with a detailed pattern, such as carbon, it is best to provide all sides with painters tape. Of course you can do this with any pattern but this is not necessary. Especially at larger pieces of films. If you paste all sides, cut the corners. Tape the film at least 8cm greater than the surface of the object. Now cut the piece out. The tape will prevent the water transfer film to roll up again when it is placed on the water surface!
IMPORTANT: Before the film lays on the water, be sure to check if you put the right side on the water. When you place the wrong side on the water, the dipping fails. To check the right side you have to moisten your fingers. Take a corner of the film between thumb and forefinger. The side of the water transfer print film that sticks to the finger, must be placed on the water surface.
STEP 5: LAY FILM ON THE WATER
Fill the bucket or tub with warm and clean water. The water temperature should be 30°C to 32°C. Check the temperature of the water with a thermometer.
Make sure that the bucket or tub is just slightly larger than the cut water transfer print film or create a barrier. This because the film is liquid after activation and spreads over the surface of the water. The film can be a bit wrinkled before you have activated it, so when the film is lock up too tight the film can’t properly be liquid after activation. And the pattern remains wrinkled. If you have a bucket or tube which can easily adjust the sides, you can make it a little tighter or looser after activation.
Make sure there are no air bubbles under the film and no water on the film! Do you have an air bubble under the film try to press gently the air bubble to the side (with latex glove). This must be done immediately after the film is laid on the water. Not after the 90 seconds !! Otherwise the film will turn out to be too soft. Is there an awkward bubble of water on the film but you have the film so spacious that you can dip the object next to it, you can still use the film. Otherwise take a new piece of film.
IMPORTANT: Soak time!! Leave the film for 90 seconds on the water. This time is needed to soak the film. The warmer the water, the shorter the soak time.
Tip: The best way to deposit the film on the water is to take two opposite corners (or sides) and from the center to deposit the film on the water surface.
Tip: If it is a large piece of water transfer printing film, we suggest to deposit the film with a second person.
STEP 6: ACTIVATOR
Shake the can of activator for 30 seconds. After soaking the film for 90 seconds, spray the activator in a thin layer on the surface of the film. (Never breathe spray mist! Work in a well ventilated area!)
Apply the activator in one layer on the surface of the film. By the application of the activator, the film becomes liquid.
Apply the activator not quickly back and forth and cross left. Then chances are that the film is not covered properly or that there is just too much activator in some places. Apply the activator calmly in orbits, for example, left to right.
IMPORTANT: After activation, the activator requires approximately 5 seconds to dissolve the film. The film is well dissolved as the film / water becomes one. The film is then like a mirror.
Tip: For large objects, you better apply the activator with a spray gun. You will need a liter bottle of activator. Then you can cover large areas of film easier and faster.
STAP 7: DIPPING
Pay attention! Consider the activation time of the activator you are using.
Dip the object slowly and evenly into the water. The dip process needs to happen in 2 to 20 seconds, depending on the size and shape of the object. When you dip the object you must ensure that you have an angle of about 20° to 40° between the surface and the object. The shape of the object determines the angle. There should never remain a bubble !!
Leave the object for about 30 seconds under water before pulling it upwards. Then remove the dipped object out of the water. If there are still remains of the film sitting on the object; do not touch it. Now let the object rest about 3 minutes. During this time, the film adheres to the object.
STAP 8: RINSE
To remove the gel / excess film remains, wash the object under running warm and clean water for 3-5 minutes.
Pay attention! Rinse water colder than dip water to prevent discoloration.
With latex gloves on, you can gently rub the surface when gel residues are still on the object after the rinse time. When the gel residues are completely washed away, you must dry the dipped object (this is completely matt). It is best to just spray with air or hair dryer (not hot) to blow off all the water, and then let the object dry. This way, the object dries the best and you will get the best end result.
When the base coat is still visible in some places, after the dipping process, you might retouch it and perhaps it is not necessary to dip the object again. See Retouch print!
STAP 9: TOP LAYER
To give the object extreme durability you need to treat it with a clear coat. You can choose from a glossy or matt. Give the object at least two coats of clear lacquer.
Tip: You can always repeat the process when it is not going as it should. Let the parts dry after washing and start again at Step 3 (application basic color). After this you can continue with STEP 4, etc..
Pay attention: If you want to dip several objects, you need to let the water rest for at least 10 minutes after each dip process. The excess activator needs to evaporate. Do you have a relatively small size bucket or tub we recommend that you change the water. Otherwise it maybe that the previously sprayed activator, which is still on the water surface, dissolves the next film immediately.
RETOUCH PRINT.
It is possible to retouch dip flaws. Sometimes it subsequently appears that the object was not cleaned properly or the angle was not quite well and the basecoat shows. Small spots can be retouched !!
Step A: After rinsing (step 8) let the object dry.
Step B: Grab a slice of the relevant print and place it on a flat surface. Just as you would lay it on the water (step 4 preparation film)
Step C: Spray some activator on the film. Now let the paint release from the film.
Step D: Grab a paintbrush and remove some paint from the film and retouch your object.
Step E: If your item has been retouched, let the object dry again.
Step F: You can perform Step 9 (object with clear coat).
POSSIBLE FAULTS AND SOLUTIONS
After the film is placed on the water surface the film dissolves immediately.
- There is still activator of the previous dipping on the water.
- The water does not has the correct temperature.
After the application of the activator, the film is not liquid.
- You laid down the wrong side of the film on the surface.
After the application of the activator, the film is not liquid everywhere.
- You have not enough activator in those places.
You can try to spray some more activator on the film.
After the application of the activator, the film is not equally liquid. The pattern is falling apart.
- The temperature of the water is not correct.
- You’ve used too many activator.
After the application of the activator, the pattern has a lot of ridges.
- You have locked the film too tight. If you have a bucket or tube which can easily adjust the sides, you can make it a little looser. The film will get more space.
- The time you used to soak the film was too short (the activator is applied too early). See Step 5 for soak time!
After the dipping of the object, the pattern has ridges.
- You have the film locked too tight.
- The time you used to soak the film was too short (the activator is applied too early). See Step 5 for soak time!
After the dipping the print does not adhere to the object. The print just slips away from the object.
- You’ve used too many activator.
After the print has been applied to the object, there are bubbles formed in some areas.
- When the film was placed on the water, air bubbles have come under the film. In places where bubbles are the film does not adhere. You can try to gently push away the air bubbles under the film (immediately after the deposit and with a latex glove).
- Because the dipping angle was not right, small bubbles remain. With a wet latex glove lightly and gently rub the bubbles (before you rinse the object). The remaining defects are usually hardly visible after spraying the clear coat.
After the print has been applied to the object, the dipping seems good but, after rinsing, dots appear in the basecoat.
- Not enough activator was sprayed on the film.
- The object has been dipped at a small angle. You need to dip at a greater angle.
- The dipping is not done calm enough and there are air bubbles stuck to the object.
- There was dust on the print or the object was not properly cleaned. Silicone residues, dust, etc.
See also retouch print.
While rinsing the dipped object, the pattern comes off and the basecoat dissolves.
- You have waited too long to rinse. This allows the activator had the opportunity to dissolve the basecoat.
The print pattern is very rough and deformed.
- The dipping is not done calm enough. This can happen, for example, with large and heavy objects. Try to be careful when dipping.
- For large objects, it is sometimes necessary to not only lower the object, but also to drag it a little to get more paint on the object. If too much is being towed relative to the lowering then you will get a build-up of paint.
There is no pattern of the print in a corner or rounded surface of the object.
- The object was already wet before you dipping the object. If the object is wet then the pattern can not attach.
- The dipping angle was not correct. If air is trapped there will be no print. The dip angle is very dependent on the type of object. Therefore often the object has to be tilted.
See also retouch print.
The HG Dipping manual can also be downloaded as a PDF file.